The 25-Second Trick For An Overview of the Latest Technology Used for OnePlus Screen Repairs in Australia

Step-by-Step Instructions: DIY OnePlus Screen Repair in Australia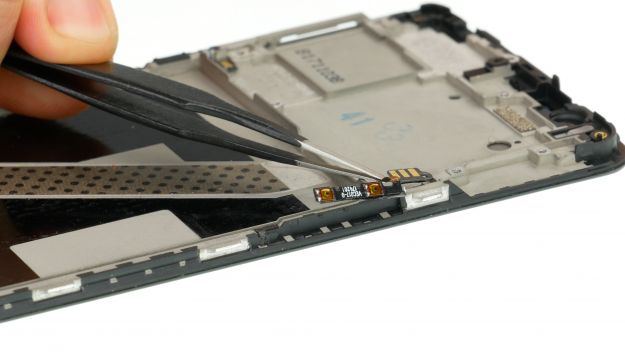
One of the very most common problems experienced through smartphone consumers is a topnotch display. Going down your phone can easily happen to anyone, and OnePlus gadgets are no exception. While it might be appealing to hurry to a professional fixing store, opting for a DIY screen fixing can save you each opportunity and funds. In this step-by-step guide, we will definitely stroll you through the method of restoring your OnePlus display yourself in Australia.
Before you begin, it's necessary to note that restoring your phone's display screen yourself might declare null and void any kind of existing guarantees or insurance policy coverage. If your device is still under warranty or dealt with through insurance, it's suggested to speak to the supplier or insurance provider for expert repair work choices. However, if you're relaxed with taking concerns into your own palms, let's get began!
Action 1: Gather the required devices
To efficiently fix your OnePlus monitor, you'll require a handful of basic devices:
1. Replacement display: Acquire a high-quality replacement display that is suitable with your details OnePlus model.
2. Screwdriver set: Make use of a accuracy screwdriver established to remove screws and open up up the unit.
3. Tweezers: You'll need tweezers to deal with small elements during the course of the repair work method.
4. Suction cup: A suction mug will assist elevate and clear away the broken display screen from the tool.
5. Plastic pry tools: These tools are essential for carefully prying available the phone without resulting in any sort of damages.
Help make sure all these tools are readily available before beginning the repair work procedure.
Measure 2: Prep your workspace
Find a well-maintained and well-lit region where you can easily comfortably function on restoring your OnePlus unit. It's recommended to put down a delicate fabric or soft towel on your workspace area to prevent scratches or harm to the phone or its elements.
Step 3: Energy off and take apart
Before beginning any kind of repairs, power off your OnePlus unit entirely. Make use of the necessary resources to take out any kind of screws securing the rear door. Delicately pry open the rear cover using plastic pry devices, making certain not to oblige or ruin any kind of internal elements.
Step 4: Remove the defective screen
Once you have accessed the inner parts of your OnePlus device, locate and detach the electric battery port. This measure is critical for avoiding any possible damage throughout the repair work process. Currently, very carefully detach any sort of connectors or cables that are connected to the defective display.
Next, use a suction cup to lift and divide the busted screen from the remainder of the tool. Slowly and progressively apply tension until you can easily conveniently eliminate it without inducing any kind of injury.
Step 5: Put up the brand-new display
Right now that you've efficiently eliminated the busted screen, it's time to mount your brand-new substitute display. Meticulously align and link all necessary cable televisions and adapters from your substitute monitor to their respective slots on your OnePlus gadget.
Gently push down on the brand-new display to guarantee a safe and secure match and reattach any type of screws that were gotten rid of previously. Take extra treatment not to overtighten them as it might lead to damage.
Action 6: Check and reconstruct
Before correctly closing up your OnePlus unit, it's necessary to evaluate if everything is working the right way. Reconnect merely vital parts like battery adapter while leaving behind various other connections loose for testing reasons.
Electrical power on your device and inspect if all features like touch level of sensitivity, show brightness, switches, and video cameras are working fine with no abnormalities or glitches. If everything seems to be great during testing, energy off your phone again prior to moving on with last reassembly.
Reconnect all staying connectors firmly and place back cover in its authentic setting. Safely tighten all screws making use of a screwdriver but be mindful not to overtighten them as it might lead to damage or strip threads.
Action 7: Last examination
Once you have accomplished reassembling your OnePlus tool, provide it a final aesthetic inspection before powering it on. Guarantee that all elements are securely in area and that there are no loose screws or wires.
Step 8: Electrical power on and take pleasure in
Power on your unit and enjoy your newly mended OnePlus monitor! If Also Found Here complied with all the steps carefully, your gadget need to currently perform correctly along with a brand-new monitor.
Through following these step-by-step instructions, you may properly restore your OnePlus display yourself in Australia. However, if at any type of aspect you feel doubtful or awkward along with the method, it's constantly absolute best to look for qualified help to steer clear of any kind of more harm to your device.